When your Chromebook's touchscreen starts acting up—whether it's registering phantom touches, refusing to respond, or simply becoming a nuisance—disabling it can feel like the most straightforward solution. But what happens when that seemingly simple fix becomes a frustrating puzzle itself? You're here because you're Troubleshooting When You Can't Disable Your Chromebook Touchscreen, and trust us, you're not alone. This guide cuts through the confusion, offering clear, actionable steps to regain control, even when your device seems to stubbornly cling to its touch capabilities.
Often, users try to disable their touchscreen to resolve issues like "ghost touches" or simply to prevent accidental input during keyboard use. While Chrome OS doesn't offer a direct toggle in its standard settings, there are established methods. If these aren't working as expected, don't throw your Chromebook out the window just yet. We'll walk you through the primary techniques and, crucially, address the common roadblocks that can make disabling your touchscreen feel impossible.
At a Glance: Your Quick Fix Roadmap
- Start with Chrome Flags: This is the easiest and most recommended method for most users, involving an experimental setting and a simple keyboard shortcut.
- Mind the Reboot: Always restart your Chromebook after making changes to Chrome Flags or using terminal commands.
- Advanced Users Only: Developer Mode & Command Line: If Chrome Flags fail, the
xinputcommand in Developer Mode offers a deeper, though riskier, alternative. - Update & Reboot: Many touchscreen issues (and difficulties disabling it) can be resolved by ensuring your Chromebook is fully up to date and performing a full restart.
- External Input is Key: Before you disable touch, always ensure you have a working touchpad or an external mouse connected. You'll need it!
Why Even Disable Your Touchscreen? Understanding the "Why" Behind the Struggle
Before diving into the "how-to," it’s helpful to understand why you might want to disable your touchscreen in the first place, and what limitations to expect. This context can save you from trying to fix a problem that disabling touch won't solve.
Many users seek to disable their touchscreen due to:
- Malfunctions or "Ghost Touches": Perhaps the most common reason, where the screen registers touches that aren't happening, making your Chromebook unusable. This can be due to software glitches or hardware degradation.
- Preventing Accidental Input: When using your Chromebook as a laptop, your palm might accidentally brush the screen, opening apps or moving cursors unexpectedly.
- Security Concerns: In some environments, disabling touch input might be part of a broader security strategy, though for most personal users, this is less common.
- Hardware Issues: Sometimes, a physical fault in the digitizer (the part of the screen that detects touch) necessitates disabling it until a repair can be made.
- Preference: Simply put, some people prefer not to use a touchscreen on a laptop, especially if they have a precise external mouse or prefer the touchpad.
It’s important to note what disabling your touchscreen doesn't do. It won't significantly reduce battery drain, as the touch digitizer component of your screen remains powered on, even if it's not actively responding to input. It's a software-level block, not a hardware disconnect. Also, if your screen is physically cracked or severely damaged, disabling touch is a workaround, not a fix for the underlying hardware problem.
Crucially, always ensure you have an alternate input device ready. Whether it's your Chromebook's built-in touchpad or an external mouse, you'll need a reliable way to interact with your device once the touchscreen is off.
The Go-To Strategy: Disabling Touch with Chrome Flags (And Why It Might Fail)
The most user-friendly approach to disabling your Chromebook's touchscreen involves leveraging Chrome Flags. These are experimental features or settings Google provides for testing purposes, offering functionalities not yet integrated into the standard OS. However, being experimental, they aren't always foolproof, which is often why users encounter issues.
How to Attempt Disabling Touch via Chrome Flags:
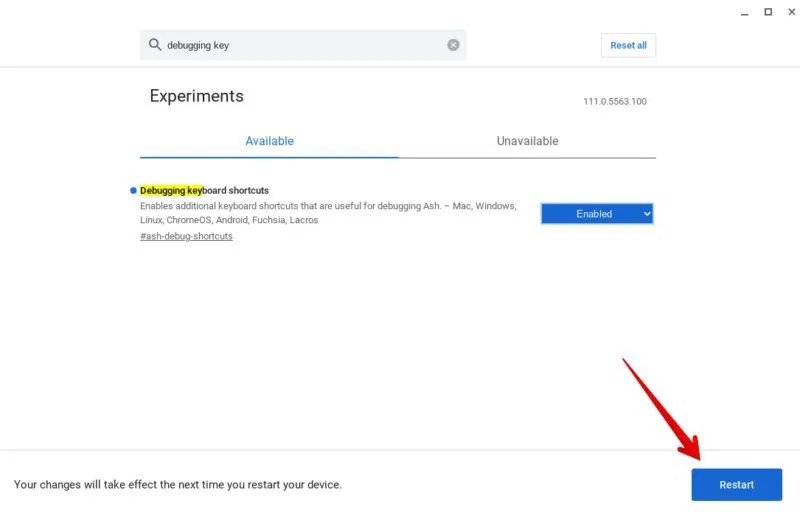
- Open the Chrome Flags Page: Launch the Google Chrome browser on your Chromebook. In the address bar, type or paste
chrome://flags/#ash-debug-shortcutsand press Enter. This takes you directly to the relevant flag. - Enable Debugging Keyboard Shortcuts: Locate the "Debugging Keyboard Shortcuts" entry. It will have a drop-down menu next to it. Click this menu and select "Enabled".
- Reboot Your Chromebook: A prompt will appear at the bottom right of your screen, asking you to "Restart" or "Relaunch" your Chromebook to apply the changes. Click this button immediately. Do not skip this step, as the flag won't take effect until a full reboot.
- Execute the Disable Command: Once your Chromebook has fully restarted, you can now use the special keyboard shortcut. Press
Search + Shift + Tsimultaneously. The Search key is typically located where Caps Lock would be on a standard keyboard (it often has a magnifying glass icon). This combination should disable both finger and stylus input.
Re-enabling Touch (If You Change Your Mind or Need to Troubleshoot):
Should you wish to bring your touchscreen back to life, there are two main ways:
- Repeat the Shortcut: Press
Shift + Search + Tagain. This is the simplest way. If, for some reason, the screen doesn't detect touch input immediately after trying this, restart your Chromebook and press the key combination again after it boots up. - Disable the Chrome Flag: Go back to
chrome://flags/#ash-debug-shortcuts. From the "Debugging Keyboard Shortcuts" drop-down, select "Disabled" and then reboot your Chromebook when prompted. This will remove the ability to use the keyboard shortcut to toggle touch, effectively re-enabling it by default (unless another issue is at play).
Why This Method Might Fail You: Common Pitfalls
If you're reading this, chances are you've tried the above steps and your touchscreen is still stubbornly active. Here are the most common reasons this method might not work as intended:
- Flag Not Enabled Correctly: Double-check that "Debugging Keyboard Shortcuts" is indeed set to "Enabled" on the
chrome://flagspage. A small oversight here can render the shortcut useless. - Skipped Reboot: The changes from Chrome Flags require a full system restart to take effect. If you enabled the flag but didn't immediately restart, the shortcut won't work.
- Incorrect Key Combination: Ensure you're pressing
Search + Shift + T(orShift + Search + Tto re-enable) simultaneously and firmly. The timing can sometimes be finicky. - Outdated Chrome OS: Older versions of Chrome OS might not support this specific flag or its associated shortcut. Keeping your system updated is always a good practice.
- Experimental Instability: As Chrome Flags are experimental, they can be unstable. Google can change or remove them without notice, or they might simply not work reliably on all Chromebook models or OS versions. This is a crucial caution that often goes unheeded: enabling experimental flags can sometimes lead to unexpected behavior or even system malfunctions.
- Underlying System Glitch: Sometimes, an deeper software bug or a minor corruption in your Chrome OS profile can prevent flags and shortcuts from functioning.
If you've meticulously followed these steps and your touchscreen remains active, it's time to consider deeper troubleshooting or, for advanced users, a more direct (and riskier) approach.
When Flags Don't Cut It: Diving Into Developer Mode (Advanced Users Only)
For users who are comfortable with command-line interfaces and understand the inherent risks, entering Developer Mode provides a direct path to manipulate hardware settings, including disabling the touchscreen. This method is not for the faint of heart, as it involves significant changes to your Chromebook's security posture and can lead to data loss.
A Critical Warning: Enabling Chrome OS Developer Mode wipes your device clean (performing a "Powerwash"), erasing all local data and user accounts. It also disables many of Chrome OS's built-in security features, making your device more vulnerable to malware and security exploits. You proceed entirely at your own risk. This method may also not work on all Chromebook models, as hardware configurations vary. If you're looking for broader guidance on disabling touch on your Chromebook, this advanced step is often reserved for truly stubborn cases.
Steps to Disable Touchscreen Using Developer Mode and Command Line:
- Enable Chrome OS Developer Mode: This is the most involved step. The process varies slightly by Chromebook model, but generally involves pressing specific key combinations during startup (often
Esc + Refresh + Power) and confirming the Developer Mode switch. Your Chromebook will then "Powerwash" and boot into Developer Mode. Do not proceed unless you understand and accept the risks. - Open the Terminal (Crosh): Once in Developer Mode, you'll eventually get to the Chrome OS desktop. Press
Ctrl + Alt + Tsimultaneously. This opens the Chrome Shell (Crosh) terminal window. - Access the Command Line: In the Crosh window, type
shelland press Enter. This command grants you access to a more powerful Linux-based command line environment. - List Input Devices: To identify your touchscreen, you need to see a list of all input devices connected to your system. Type
xinput listand press Enter. - Identify Your Touchscreen Device: Carefully examine the output. Look for entries that clearly indicate a "touchscreen" or "touchpad" device. It will typically have a name like "ELAN Touchscreen," "ATML1000:00 04F3:260A Touchscreen," or something similar, followed by an
id=number. Note down the specificidnumber associated with your touchscreen. Sometimes, the touchscreen might be listed as a "pointer" device. If you see multiple similar entries, you may need to experiment. - Execute the Disable Command: With your touchscreen's ID number in hand, execute the following command. Replace
[device-id]with the actual ID number you noted in the previous step:xinput set-prop [device-id] "Device Enabled" 0
For example, if your touchscreen's ID was10, you would type:xinput set-prop 10 "Device Enabled" 0
Press Enter. - Reboot Your Chromebook: While the change might take immediate effect, a full system reboot is often required to ensure the setting persists and is properly applied.
What to Do If Developer Mode Commands Fail:
- Check for Typos: Command-line inputs are unforgiving. Even a single typo can lead to an "command not found" error. Double-check your spelling and spacing.
- Correct Device ID: Ensure you've identified the correct device ID for your touchscreen. Sometimes a trial-and-error approach with similar-sounding IDs might be necessary (though proceed with caution).
- Permissions: While
shellusually grants sufficient permissions forxinput, occasionally a more privileged command (likesudo) might be needed for certain operations in a full Linux environment, but typically not forxinputin Crosh. - Device Compatibility: Not all Chromebooks fully support
xinputcommands in Developer Mode in the same way. Some newer or more restrictive models might have limitations. - Re-enabling: To re-enable the touchscreen using this method, simply change the
0to1in thexinput set-propcommand:xinput set-prop [device-id] "Device Enabled" 1
Then, reboot your Chromebook.
Common Hurdles & How to Clear Them When Touch Won't Quit
You've tried the Chrome Flag method, maybe even ventured into Developer Mode, and your touchscreen is still active. This is where the real troubleshooting begins.
"I Enabled the Flag, But the Shortcut Doesn't Work!"
- Are You Sure You Rebooted? We can't stress this enough. Chrome Flag changes often don't register until a full restart. Go through the sequence again: enable flag, click "Restart."
- Check the Flag Status Again: After rebooting, navigate back to
chrome://flags/#ash-debug-shortcuts. Is it still set to "Enabled"? Sometimes flags can reset due to updates or system anomalies. - Verify Chrome OS Version: Ensure your Chromebook is running the latest stable version of Chrome OS. Older versions might have bugs or lack support for specific flags/shortcuts. Go to
Settings > About Chrome OS > Check for updates. - Try the Re-enable Shortcut First: Oddly, sometimes pressing
Shift + Search + T(the re-enable shortcut) beforeSearch + Shift + Tcan "wake up" the system's ability to recognize the toggle. It's a long shot, but worth a try. - Powerwash (as a last resort for Flags): If you suspect a deeper software glitch preventing flags from working, a Powerwash (factory reset) might resolve it by giving you a clean slate. Remember, this wipes all local data.
"Developer Mode Commands Aren't Found or Don't Work."
- Did You Type
shell? Remember,xinputcommands are typically part of the full Linuxshell, not the initial Crosh terminal. Make sure you typedshelland pressed Enter before tryingxinput. - Exact Command Syntax:
xinput set-prop [device-id] "Device Enabled" 0is very specific. Any deviation (missing quotes, incorrect casing, wrong number of spaces) will cause it to fail. - Correct Device ID: This is critical. If
xinput listreturns many entries, you might have picked the wrong one. Look for "touchscreen" specifically. If you have a separate touchpad, ensure you're not accidentally disabling that instead. - Temporary Fluke? Sometimes, command-line operations can be finicky. Try closing the terminal, reopening it, and repeating the steps carefully.
"My Touchscreen Still Works After Rebooting (Both Methods Failed)!"
This is the most frustrating scenario, implying a deeper issue.
- Run a Comprehensive System Update: A fresh update can fix underlying drivers or OS components that might be interfering with touch controls or the ability to disable them. Go to
Settings > About Chrome OS > Check for updates. Install any pending updates and reboot. - Consider External Factors:
- Screen Protectors: Ill-fitting or damaged screen protectors can sometimes mimic touch input or prevent software commands from registering correctly. Try removing it temporarily.
- Physical Damage: If your screen has been dropped or had liquid spilled on it, physical damage to the digitizer itself might be causing constant input, which a software disable can't completely override. In such cases, the touchscreen might technically be "disabled" but the hardware is still sending faulty signals.
- Hardware Reset (EC Reset): This is a deeper reset than a simple reboot. For most Chromebooks, you turn it off, then hold down the
Refreshkey and tap thePowerbutton. ReleaseRefreshonce it starts booting. This can often resolve hardware-level glitches without wiping data. - Powerwash (Factory Reset): If all else fails, a Powerwash is your last resort for software-related issues. It resets your Chromebook to its factory settings, wiping all local data and reinstalling a fresh copy of Chrome OS. This often resolves stubborn software conflicts that prevent touch from being disabled. After a Powerwash, immediately try the Chrome Flags method again.
- Contact Manufacturer Support: If even a Powerwash doesn't work, it strongly suggests a hardware fault. Your touchscreen's digitizer might be physically malfunctioning, requiring professional repair or replacement.
Beyond Disabling: Proactive Steps for a Healthier Chromebook
While you're working through the troubleshooting steps to manage your touchscreen, consider these general best practices to keep your Chromebook running smoothly and potentially prevent future issues.
The Power of a Simple Reboot
It sounds cliché, but a simple restart often resolves a surprising number of minor software glitches. It clears temporary memory, resets processes, and can resolve conflicts that might be preventing your touchscreen from being properly disabled. Make it a regular habit, especially if you leave your Chromebook running for days on end.
Keep Your Chromebook Updated
Google consistently rolls out updates for Chrome OS that include bug fixes, security patches, and performance improvements. An outdated system might have known issues that have already been resolved in newer versions. Always ensure your device is on the latest stable channel. You can check for updates in Settings > About Chrome OS > Check for updates.
Hardware Check-Up
Sometimes, the "can't disable" problem isn't about the software's ability to turn off touch, but rather a persistent hardware signal.
- Clean Your Screen: Dust, smudges, or even a tiny piece of debris can sometimes cause phantom touches. Gently clean your screen with a microfiber cloth designed for electronics.
- Inspect for Damage: Look closely for hairline cracks, pressure points, or signs of impact on your screen. Even subtle damage can affect touchscreen functionality.
- Test External Input Devices: While troubleshooting, ensure your touchpad or external mouse is working flawlessly. This confirms you have reliable control points outside of the problematic touchscreen.
Understanding Powerwash: Your Software Reset Button
A Powerwash, or factory reset, is a powerful tool. It returns your Chromebook to its out-of-the-box state, removing all user data, installed apps, and custom settings. While disruptive, it's often the ultimate fix for persistent software problems that can't be resolved through other means. If the Chrome Flags method still fails after a Powerwash, it strongly points towards a hardware issue rather than a software one. Back up all important local files (like your Downloads folder) before initiating a Powerwash.
Making the Choice: Chrome Flags vs. Developer Mode – Which Path for You?
Deciding which method to pursue when you need to disable touch on your Chromebook is crucial, balancing ease of use against potential risk and effectiveness.
| Feature | Chrome Flags Method (Search + Shift + T) | Developer Mode (xinput Command) |
|---|---|---|
| User Friendliness | High (simple browser steps & shortcut) | Low (requires command line, Linux knowledge) |
| Risk Level | Low (experimental features, but generally safe) | High (wipes data, compromises security, advanced config) |
| Data Loss | None | Guaranteed (upon enabling Developer Mode) |
| Security Impact | None | Significant (disables verified boot, lowers overall security) |
| Reversibility | Easy (toggle flag or re-press shortcut) | Easy (toggle command), but reverting Developer Mode is a Powerwash |
| Effectiveness | Good for software issues, but may not work on all devices | Potentially more robust for stubborn issues, direct hardware control |
| Target Audience | Most users seeking a quick fix for touch issues | Advanced users, developers, or those with very specific needs |
| Our Recommendation: Always start with the Chrome Flags method. It's designed to be relatively safe and straightforward. Only consider Developer Mode if the Chrome Flags method consistently fails, you've exhausted all other troubleshooting steps (like updates and Powerwash), and you fully understand and accept the significant risks involved. For the average user, the security implications and data loss associated with Developer Mode are too great for just disabling a touchscreen. |
Final Thoughts: Regaining Control Over Your Chromebook
Dealing with a touchscreen that won't cooperate can be incredibly frustrating, especially when the usual "disable" methods seem to fail. But by systematically working through the options – starting with the accessible Chrome Flags, moving to comprehensive software updates and reboots, and only then cautiously considering the advanced Developer Mode approach – you significantly increase your chances of success.
Remember, technology doesn't always behave as expected. Patience and methodical troubleshooting are your best tools. If, after all these efforts, your Chromebook's touchscreen remains an unruly ghost, it's likely time to consider a hardware diagnosis from a qualified technician. At that point, you've done everything you can from the software side, and the problem points to something more fundamental within the device itself. You're now equipped with the knowledge to diagnose the problem and decide on your next best course of action, taking back control of your digital experience.