It's frustrating when your Chromebook's touchscreen, designed for convenience, becomes a source of distraction. Whether you're battling accidental taps, erratic cursor jumps, or simply prefer a traditional keyboard and mouse experience, understanding the Common Reasons to Disable Touch on Your Chromebook can significantly improve your workflow. This guide cuts through the noise, offering clear, actionable steps to regain control over your device.
At a Glance: Why and How to Disable Your Chromebook's Touchscreen
- Why disable? Prevent accidental input, extend battery life, improve focus, keep your screen cleaner, and troubleshoot phantom touches.
- Best for most: The Chrome Flags method offers a simple
Search + Shift + Ttoggle. - Model-specific: Some Chromebooks have native settings for touchscreen control.
- Advanced option: Terminal commands offer powerful control but require Developer Mode (which wipes your data).
- Safe to disable: It won't harm your Chromebook or interfere with updates or other input methods.
- When to keep it: Ideal for Android apps, stylus use, tablet mode, and specific accessibility needs.
Taming the Touch: When Your Touchscreen Becomes a Foe
Chromebooks with touchscreens offer a versatile, tablet-like experience. Yet, for many users, that very versatility can turn into an annoyance. Think about it: you're deep in a document, typing away, and suddenly your cursor leaps across the screen, or a menu pops up unexpectedly. These aren't just minor glitches; they can seriously disrupt your concentration and productivity.
The reality is, while touch is fantastic for quick taps and tablet mode, it's often redundant or even detrimental when you're using your Chromebook like a laptop—with a keyboard, mouse, or an external monitor.
Preventing Accidental Input While You Type
One of the most frequent complaints comes from typists. Our hands naturally rest on the palm rests, and an errant brush against the touchscreen can lead to unintended selections, text deletions, or cursor jumps. This "palm rejection" issue is common, and disabling the touchscreen ensures your typing flow remains uninterrupted.
Boosting Your Focus and Minimizing Distractions
Imagine a workspace free from unexpected digital disruptions. Every time an accidental touch registers, it pulls your attention away from the task at hand. By removing the touchscreen as an active input method, you create a more predictable and focused digital environment, allowing you to dive deeper into your work without unnecessary interruptions.
Extending Your Chromebook's Battery Life
Every component drawing power contributes to battery drain. While a touchscreen's power consumption isn't enormous, it does require energy to remain active, detect touches, and process input. Disabling it means one less sensor constantly working in the background, potentially squeezing a little more juice out of your battery, especially on older devices.
Maintaining a Pristine Screen
Our fingers carry oils and dirt, inevitably transferring them to the screen with every tap. While screen cleaning cloths exist, an easier solution might be to simply remove the need to touch the display. Disabling the touchscreen keeps fingerprints at bay, ensuring your visuals remain crisp and clear without constant wiping.
Quieting Erratic Touchscreen Behavior (Ghost Touches)
Sometimes, a touchscreen develops a mind of its own. "Ghost touches" – where the screen registers input even when nothing is touching it – can make a Chromebook almost unusable. Other times, the screen might become entirely unresponsive. Disabling the touchscreen is often the first, most effective troubleshooting step for these frustrating hardware glitches, helping you determine if the problem is software-related or a deeper hardware issue.
Tailoring for Educational and Specific Use Cases
In educational settings, especially with younger children or during standardized testing, accidental touches can be a major issue. Many school-managed Chromebooks may even benefit from having touch disabled by default. For parents, it can help prevent toddlers from inadvertently closing apps or navigating away from educational content. It's about creating a controlled environment that serves a specific purpose.
Your Toolkit: How to Disable Touch on Your Chromebook
ChromeOS, unlike some other operating systems, doesn't always offer a straightforward "turn off touchscreen" toggle in its main settings. Instead, control is typically handled through more specialized features. Let's explore the most effective methods, from user-friendly shortcuts to advanced terminal commands.
1. The Chrome Flags Shortcut: Quick, Reversible, and Recommended
This is by far the most popular and user-friendly method for most Chromebook owners. It's reversible, doesn't require developer mode, and gives you a handy keyboard shortcut to toggle touch on or off as needed.
Step-by-Step Activation:
- Open Chrome: Launch the Chrome browser on your Chromebook.
- Navigate to Flags: In the address bar, type
chrome://flags/#ash-debug-shortcutsand pressEnter. This will take you directly to the relevant Chrome Flag. - Enable the Flag: Locate the flag titled "Debugging keyboard shortcuts." Click the dropdown menu next to it and change the option from "Default" to "Enabled."
- Restart ChromeOS: A "Restart" button will appear at the bottom right of your screen. Click it to reboot your Chromebook and apply the changes.
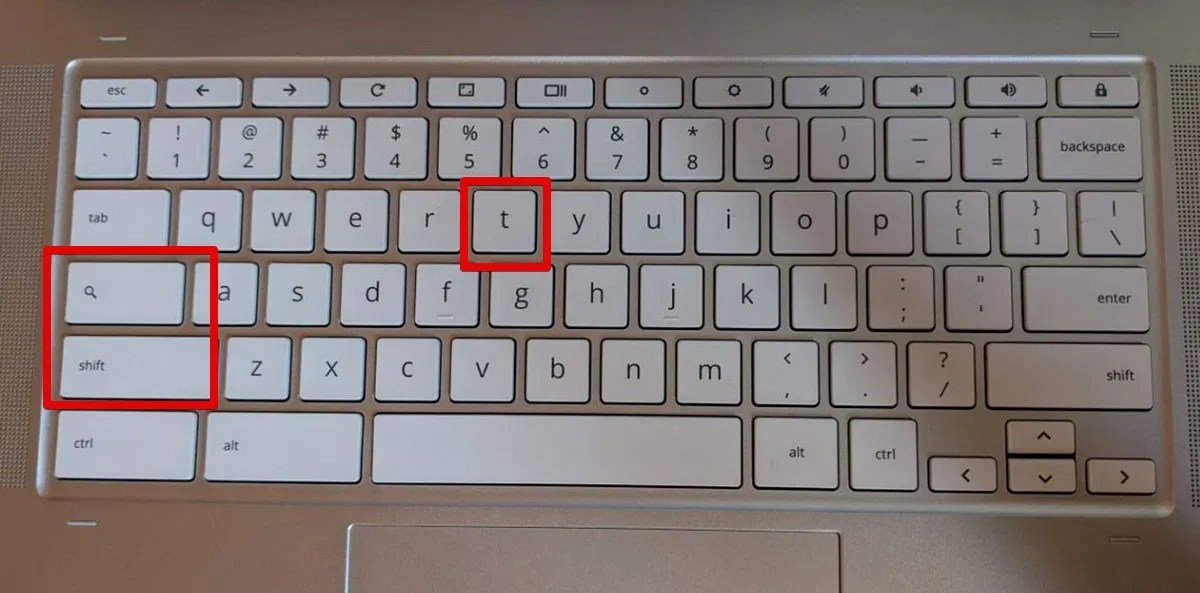
Toggling Your Touchscreen:
Once your Chromebook restarts, the magic key combination is Search + Shift + T. Pressing these three keys together will immediately disable your touchscreen. Pressing them again will re-enable it. You might not see a visible confirmation, but the change takes effect instantly. Give your screen a tap to confirm!
Important Notes on Chrome Flags:
- Experimental: Chrome Flags are experimental features, meaning they're not officially part of the stable ChromeOS settings.
- Stability & Variation: They might be unstable, their behavior can vary slightly between ChromeOS versions, and they may occasionally be removed or altered in future updates.
- Updates May Reset: Major ChromeOS system updates can sometimes reset your flags to their default state. If your touchscreen suddenly reactivates after an update, simply re-enable the "Debugging keyboard shortcuts" flag.
2. Chrome OS Settings: A Model-Dependent Option
Some Chromebook models, particularly newer ones or specific brands like HP, have started integrating native touchscreen controls directly into the ChromeOS settings. This is often the most stable solution if available, as it's an official feature, not an experimental flag.
How to Check for Native Settings:
- Access Quick Settings: Click on the time/date in the bottom-right corner of your screen to open the Quick Settings panel.
- Open Settings: Click the gear icon to launch the full ChromeOS Settings app.
- Navigate Device Settings: In the left sidebar, look for and click on the "Device" section.
- Explore Input Options: Within the "Device" section, check subsections like "Display," "Touchpad and stylus," or "Input devices." You might find a direct "Touchscreen" toggle or related settings for input.
Notes on Availability:
The presence of this setting is highly dependent on your specific Chromebook model and the version of ChromeOS you're running. If you don't find it, don't worry—the Chrome Flags method remains a reliable alternative.
3. Terminal Commands: For the Technically Adventurous (and Patient)
This method offers the most granular control but comes with significant prerequisites and is generally recommended only for advanced users comfortable with command-line interfaces. It requires enabling Developer Mode, which wipes all local data on your Chromebook.
Prerequisites (Read Carefully!):
- Backup Everything: Before you begin, ensure you have backed up all important local data, files, and downloaded content to Google Drive or an external drive. Enabling Developer Mode will perform a Powerwash.
- Enable Developer Mode:
- Enter Recovery Mode: Press
Esc + Refresh (F3) + Powersimultaneously. - At the recovery screen, press
Ctrl + D. - Confirm the prompt to proceed. Your Chromebook will then wipe itself and reboot into Developer Mode. This process takes some time.
Step-by-Step Terminal Method:
- Open Crosh Terminal: Once in Developer Mode, press
Ctrl + Alt + Tto open the Crosh terminal. - Access System Shell: Type
shelland pressEnter. This gives you access to the underlying Linux system shell. - List Input Devices: Type
xinput listand pressEnter. This command displays a list of all active input devices on your Chromebook. - Identify Touchscreen: Carefully examine the list. Look for entries that clearly indicate a touchscreen, such as "ELAN Touchscreen," "Atmel MaXTouch," or similar. Note the ID number associated with your touchscreen device (it's usually a two-digit number).
- Disable Touchscreen: Type
xinput disable [ID](replace[ID]with the actual ID number you noted, e.g.,xinput disable 12). PressEnter. - Verify: To confirm it's disabled, type
xinput listagain. The touchscreen device should now be listed as(disabled).
Re-enabling the Touchscreen:
To re-enable your touchscreen using this method, simply use the command xinput enable [ID] (again, replacing [ID] with your device's ID number).
Notes for Advanced Users:
- Temporary Change: Changes made via
xinputare typically temporary. They usually do not persist after a reboot, meaning you'll need to re-enter the commands each time you restart your Chromebook. - Complexity: Making these changes permanent requires deeper scripting and system configuration, which is beyond the scope of this guide and only suitable for highly experienced Linux users.
- Developer Mode Risks: Developer Mode reduces some security features and can expose your system to more risks if you're not careful. It also means you'll see a "OS verification is OFF" screen at boot, which you must skip by pressing
Ctrl + D.
Beyond Disabling: Understanding the Impact and Alternatives
Choosing to disable your touchscreen is a software-based decision, not a hardware modification. This means it's generally safe and reversible, but it's important to understand what changes—and what doesn't.
What Disabling Your Touchscreen Impacts (And What It Doesn't)
- Software-Based: Disabling the touchscreen is purely a software command. It does not physically disconnect or damage your hardware in any way.
- No Impact on Other Inputs: Your trackpad, external mouse, and keyboard will continue to function exactly as before. If your Chromebook supports a stylus, that input method will also remain unaffected unless explicitly disabled.
- System Updates: Disabling touch does not interfere with ChromeOS updates or system stability.
- Reversible: All methods discussed are reversible, allowing you to reactivate your touchscreen whenever you wish.
When to Keep Your Touchscreen Enabled
While there are many excellent reasons to turn off touch, it's not a universal solution. Touchscreens shine in specific scenarios:
- Android Apps: Many Android apps on ChromeOS are designed with touch in mind, making interaction much more intuitive.
- Digital Art & Note-Taking: If you use a stylus for drawing, sketching, or handwriting notes, the touchscreen is indispensable.
- Accessibility Needs: For users who find touch input easier than a trackpad or mouse, the touchscreen is a vital accessibility feature.
- Tablet Mode: When you fold your convertible Chromebook into tablet mode, the touchscreen becomes the primary (and often only) input method.
- Casual Browsing: For quick web navigation, swiping through articles, or zooming, touch can be faster and more natural.
- Presentations: When presenting, using touch to interact with slides or quickly highlight points can be very effective.
Consider your primary use cases. If you frequently rely on any of these functionalities, you might opt for the Chrome Flags method for its easy toggling, rather than a permanent disable. For a more comprehensive overview of all your options when it comes to controlling your touchscreen experience, you might want to learn more about how to disable touchscreen on Chromebook.
Troubleshooting: Why Does My Touchscreen Keep Turning Back On?
If you've disabled your touchscreen, only for it to mysteriously re-enable itself, here are a few common culprits and quick fixes:
- ChromeOS Updates: As mentioned, major system updates can sometimes reset Chrome Flags to their default settings. Revisit
chrome://flags/#ash-debug-shortcutsand ensure "Debugging keyboard shortcuts" is still enabled. - Reapply the Shortcut: After a reboot, especially if your Chromebook takes a moment to fully load, sometimes the
Search + Shift + Tcommand needs to be reapplied. - Admin Restrictions: If you're using a school or work-managed Chromebook, administrators often have policies in place that can override user settings or prevent certain flags from being enabled. In such cases, you might not have full control over the touchscreen.
- Hardware Issues (Less Common): If your touchscreen keeps reactivating despite flags being enabled and no administrator policies, it could indicate an underlying hardware issue causing the system to re-detect and re-initialize the touch digitizer. This is rare for this specific symptom but possible.
Beyond Software: Physical Workarounds
While not ideal for a truly disabled touchscreen experience, sometimes a physical barrier can be a temporary solution, especially for preventing accidental touches:
- Thick Screen Protectors/Overlays: A very thick, matte screen protector or a custom-cut, transparent overlay can sometimes reduce the sensitivity of the touchscreen or make it harder for light touches to register.
- Protective Cases: Some folio or rugged cases designed for convertible Chromebooks might feature frames that slightly lift around the screen's edges, potentially reducing the chance of accidental palm touches.
It's important to note that these physical solutions are imperfect. They can affect display quality, responsiveness, and are generally not as effective or clean as a software-based disable.
Making Your Choice: Which Method is Right for You?
Deciding how to disable your Chromebook's touchscreen depends largely on your comfort level and how frequently you want to toggle the feature.
- For Occasional Users & Troubleshooting (Recommended for Most): The Chrome Flags method with the
Search + Shift + Tshortcut is your best bet. It's quick, reversible, and doesn't require any data wipes or advanced technical knowledge. It's perfect for when you need to focus on typing or troubleshoot an issue. - For Permanent Disabling (If Available): If your Chromebook model offers native touchscreen controls within the Chrome OS Settings, use it. This is a stable, officially supported way to manage your touchscreen and will persist across reboots.
- For Advanced Users & Deep System Control: The Terminal Commands method is powerful but comes with the significant caveat of requiring Developer Mode and a data wipe. Only pursue this if you're comfortable with Linux commands, understand the risks, and are prepared for the changes to potentially be temporary after a reboot. Always, always back up your important data before attempting advanced methods that involve Developer Mode.
A Smoother Experience Awaits
Your Chromebook is a versatile tool, and sometimes, making it work best for you means customizing its inputs. Disabling the touchscreen can transform your device from an occasionally frustrating gadget into a focused, efficient workstation, free from accidental taps and ghost touches. By choosing the right method, you're not just turning off a feature; you're actively enhancing your digital environment, allowing you to work, study, and create with greater ease and fewer interruptions. Embrace the control, and enjoy a truly smoother Chromebook experience.